Node editors are one of the more discussed use cases for the dear imgui UI library, and there are lots of gists as well as fully-fledged implementations for them on Github. If you want to implement your own node editor, you can get cracking! However, my pet peeve with the available samples and implementations is that they often aren’t immediate mode and don’t obey dear imgui’s philosophy of being lightweight and dependency free.
imnodes is my attempt at writing a small node editor extension for dear imgui. It provides a very dear imgui-like API for the node editor, and is written in the same style of C++ as dear imgui itself. My goals for imnodes are
- to be able to create nodes and links with an immediate mode API
- and to line up node pins with the embdedded
dear imguiUI elements automatically
The API at a glance
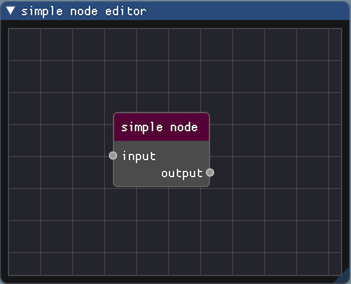
Below is a small taste of what using the extension looks like. You can easily mix the nodes with dear imgui UI code.
|
|
The code creates an editor workspace along with a simple node, with only an input and output attribute.
In the sample code above, it is apparent that the BeginNode and BeginInputAttribute / BeginOutputAttribute calls require an integral id. Unlike dear imgui, where UI elements are identified by names (which are then internally converted to integer ids), imnodes uses integer ids directly. For a node UI, we want to have multiple nodes with the same name, so it makes more sense to just have a user-provided id to differentiate between nodes.
The immediate benefit of an immediate mode API is how easy it is to change the UI layout. A collection of nodes will require a collection of node ids, and it’s only natural to store them in a container of some kind. Nodes can then be rendered by looping over the container.
|
|
With this scheme, adding and removing a node is as easy as adding and removing ids to and from the container!
If you want to see a more complete step-by-step tutorial and usage examples, feel free to check out the imnodes README on github.
Under the hood
Rendering the nodes, pins, and links in an immediate mode API is a fun exercise, since they can only be drawn after the node UI content itself is rendered. Only then will the actual size of the node and placement of the pins (and links) be known.
While the immediate mode API is mostly stateless, the position of every node in the workspace is stored behind the scenes. When BeginNode is called, the extension places the rendering cursor at the node’s stored origin. Internally, imnodes calls ImGui::BeginGroup in order to capture the node’s UI bounding box. Likewise, the BeginInputAttribute / BeginOutputAttribute functions merely start a group to capture the attribute’s bounding box. As a result of the following chunk of code,
|
|
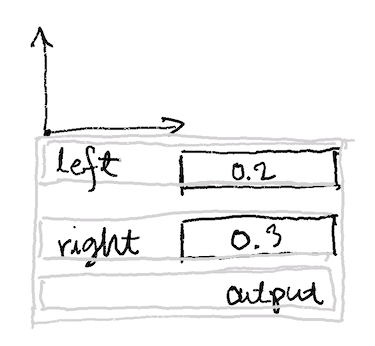
the drawing state will look like:
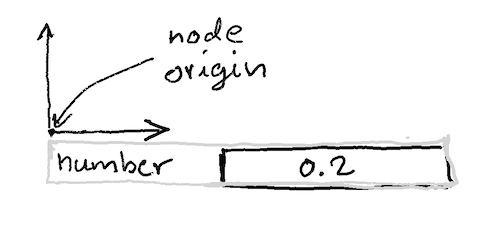
The first attribute starts at the node origin and the attribute bounds (shown in grey) are captured after calling EndAttribute(). Likewise, a call to EndNode() stores the entire node’s bounding box.
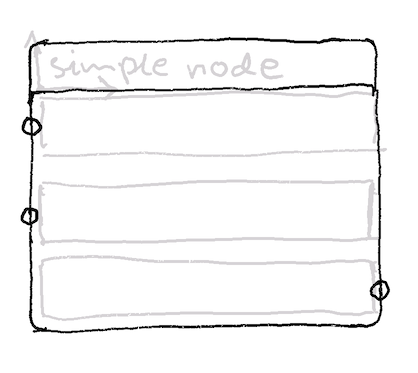
When EndNodeEditor is called, the positions of all the UI elements are known, and we can finally render them. In order to render our node elements behind the dear imgui UI elements, the elements are drawn in different layers using dear imgui’s draw list channels:
|
|
Nodes are rendered by starting out at the origin, rendering the bounding box, then adding the title bar on top. Pins are simply rendered at hte y-midpoint of each attribute bounding box, either on the left or right of the resulting node boundary.
Since the node, link, and pin positions are known as they are rendered, they are all tested against the mouse position to figure out whether the mouse is hovering or selecting a UI element.
Nodes and pins are easy to test against: the node is an invisible button, and we just use dear imgui’s built-in functions for testing whether the mouse is hovering or selecting the button. Pins are circles, which are easy to test as well: if the mouse is just sufficiently near the pin center, it gets highlighted.
The links are cubic bezier curves, which makes computing the smallest mouse-link distance a bit tricky. A simple hierarchical algorithm is used. The curve is divided into n discrete segments. Then we can use the bezier function to compute the position of the midpoint of each segment and find the position closest to the mouse. Then we repeat the process for the closest segment recursively a few times.

Thanks for reading!